A flush-trim router bit kicks back when the cutters grab the work and pull it faster than you can control it. The usual underlying cause is self-feeding: the bit is being fed with its rotation, takes too large a bite, loses and regains contact, or meets poorly supported stock at a vulnerable grain transition. A new bit can make the event more dramatic because it cuts aggressively, but newness alone is not the diagnosis.
Stop using the setup until you can identify the feed direction, where the bearing is riding, and how much material the cutters are removing. For most work, use a conventional cut against cutter rotation, keep the template and work firmly supported, and remove excess material in more than one pass. Do not attempt to solve repeated grabbing by simply gripping harder.
What kickback looks like with a flush-trim bit
With a handheld router, kickback may pull the router sideways or forward along the edge. At a router table, it can pull the workpiece into the cutter and throw it back toward the operator. In both cases, the cutter has gained enough purchase to accelerate the work instead of making a controlled shaving.
A bearing-guided bit does not prevent this by itself. The bearing establishes the final path by following a template or finished edge. The cutters still have to remove the overhanging material, and they can grab if the cut is too heavy, the feed is wrong, or the stock moves.
The most common causes
Feeding with the bit rotation
Wrong feed direction is the primary kickback cause to rule out first. At a router table, where the bit rotates counterclockwise when viewed from above, the normal feed is from right to left so the work moves against cutter rotation. Feeding left to right can allow the bit to pull the work along with its rotation and self-feed it. RouterPlan explains this router-table mechanism and feed direction.
For a handheld router, direction depends on whether you are routing an outside edge or an inside opening. Rather than memorizing a single clockwise or counterclockwise rule without reference to the cut, look at the cutter rotation and plan the pass so the cutter pushes back against your travel rather than pulling the router ahead.
A brief, controlled climb-cut may be used by experienced woodworkers in limited situations to reduce tear-out. It is not a general-purpose flush-trimming method, and it is not a safe correction for a bit that is already grabbing. If you are still learning router control, avoid climb cutting and change the setup instead.
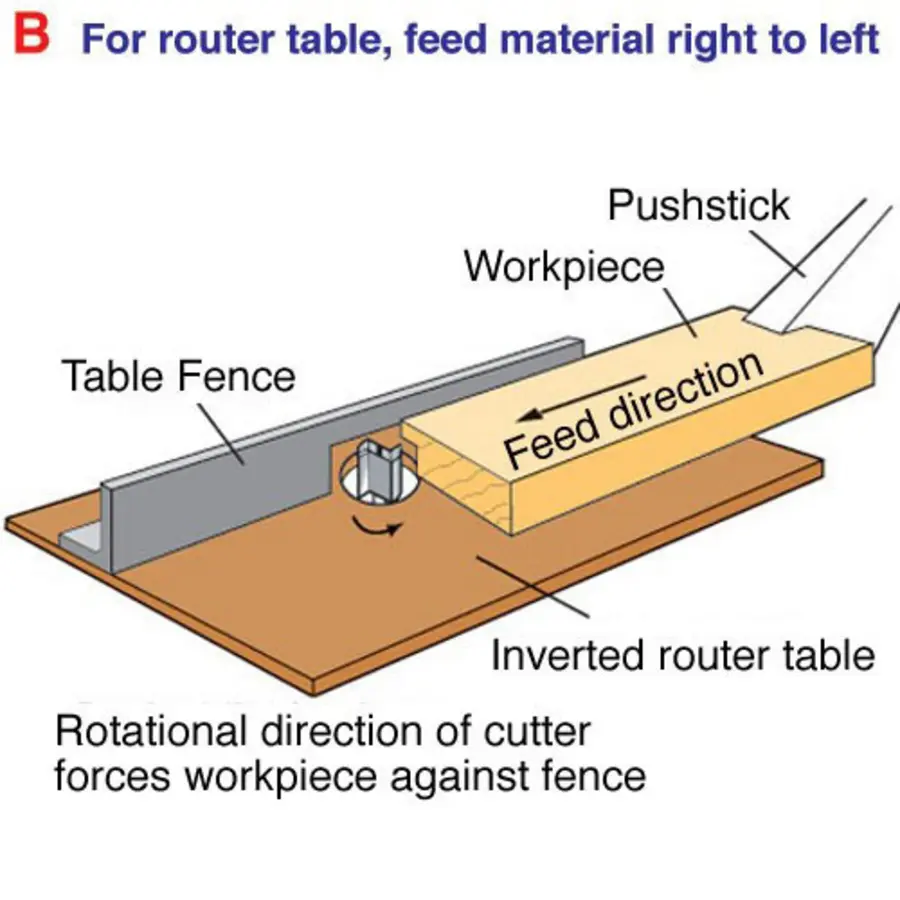
Source: Trend-usa
Too much material for the bit to remove
A flush-trim bit is for bringing a workpiece to a template or reference edge, not for hogging away a wide overhang in one pass. When a large amount of waste reaches the cutters, the bit can pull itself into the material, especially at a corner, on end grain, or where the stock is thin.
Rough-cut close to the template first. Leave only a small, consistent amount for the flush-trim bit, then make the final pass. If the stock is thicker than the cutter length or requires substantial removal, use staged cuts and reposition the template or use a suitable bearing arrangement so the bit is not cutting an excessive full-depth section at once.
Grain changes, end grain, knots, and corners
Long grain may cut smoothly until the bit reaches a section where the grain rises into the cutter. End grain, figured wood, knots, and abrupt direction changes can increase resistance and encourage the bit to grab. A corner is especially risky because the bit can enter a fresh edge abruptly.
Approach these areas with a light cut and steady feed. Do not pause with the cutters buried in the edge. If a section repeatedly tears out or grabs, remove more waste beforehand, alter the order of operations, or use a different machining method for that section rather than forcing a single continuous pass.
Poor workholding or inadequate support
The workpiece and template must behave as one rigid assembly. If the template flexes, shifts, lifts, or is too narrow to guide the bearing consistently, the bit can take an unexpected bite. Small parts are particularly dangerous because there may be too little surface area to hold safely and too little mass to resist cutter force.
Clamp or otherwise secure the work where practical, and use a larger carrier board, jig, or fixture for small pieces. At a router table, use a fence, starting pin, or other appropriate support only when it suits the operation and is used as directed by the equipment manufacturer. Keep hands away from the cutter path; verify the router’s manual and current official safety guidance for the proper guards, workholding, and push-device practices for your machine.
Bearing or template problems
The bearing must contact the intended reference edge throughout the cut. If it drops below the template, rides on rough waste instead of the template, or reaches a gap or damaged spot, the cutters can move into more material than expected. A damaged template edge can also steer the bearing and the router unpredictably.
Before turning on the router, rotate the bit by hand with the router unplugged and confirm that the bearing has a clear, continuous path. Check that the bearing turns freely, is positioned to contact the template at the planned cutting depth, and matches the bit’s intended setup. Bearing-guided router bits are designed to follow the adjacent template or workpiece face, so the reference surface must be sound and accessible. Wood Magazine provides an overview of how guide bearings follow an edge.
Bit runout, vibration, or a poor setup
A new bit can still be installed incorrectly or damaged. A bit that is not seated and tightened according to the router manual, a worn collet, contamination in the collet, or a bent shank can create vibration. Vibration can make the cutter intermittently lose contact and re-enter the wood, raising the chance of a grab.
With the router disconnected from power, inspect the bit, bearing, shank, collet, and template. Do not use a chipped, damaged, loose, or questionable bit. Confirm the bit is compatible with the router and collet, and follow the router and bit manufacturers’ current instructions for installation, tightening, speed limits, and maximum cutting depth. Do not assume a bit is safe at a particular speed because it fits the collet.
A safer flush-trimming sequence
- Make the template rigid, smooth, and securely attached to the work.
- Rough-cut the workpiece close to the template so the router removes only a modest, even margin.
- Choose a bearing position that will maintain contact with the template for the entire pass.
- Support the work fully. Use a larger fixture or carrier when the part is too small to control safely.
- Identify conventional feed direction before starting. At a router table, this is generally right to left when viewed from above.
- Start on a low-risk section rather than plunging into a tight corner or difficult end-grain area.
- Keep the bearing in steady contact with the template and maintain a continuous, controlled feed.
- Stop immediately if the router begins pulling, chattering, vibrating, or demanding excessive force. Disconnect power before inspecting or adjusting anything.
Handheld router versus router table
The basic hazard is the same, but the moving object differs. With a handheld router, you control the router while the template-work assembly is secured. With a router table, the bit is fixed and you move the workpiece. Do not transfer direction rules casually between the two setups; cutter rotation, the side of the work being cut, and whether the cut is inside or outside all matter.
A router table adds the risk that a small workpiece can be pulled from your hands. Do not flush-trim a part on a table if it cannot be supported and guided with safe clearance from the bit. A bit with bearings positioned for different template locations can sometimes simplify support, but changing bits does not replace correct feed direction and secure control. KM Tools notes that top- and bottom-bearing options can help suit different router-table situations.
When the material is the problem
Material can contribute to a kickback, but it is rarely a reason to accept one. Dense hardwood, resinous wood, voids in plywood, knots, unstable laminations, and highly figured grain can all make cutter engagement less predictable. Thin stock can flex into the bit, while a warped assembly may prevent the bearing from tracking evenly.
If the problem happens at the same point every time, mark that spot and inspect it. Look for a knot, end-grain transition, glue-line mismatch, void, loose veneer, or a place where the template is no longer firmly supported. Then reduce the amount of material being removed and reconsider the cutting sequence.
Quick diagnosis after a kickback
Ask these questions before trying again:
- Was the feed direction conventional for this specific cut and machine setup?
- Was the bit removing more than a small, consistent overhang?
- Did the bearing stay on the template for the entire pass?
- Did the workpiece, template, or fixture move or flex?
- Did the grab occur at a corner, knot, end grain, or grain reversal?
- Was there chatter, vibration, bearing drag, or visible bit damage?
- Is the part too small to control safely in the chosen setup?
If you cannot answer those questions confidently, do not resume the same operation. Rebuild the setup around a lighter cut, better support, and conventional feed direction.
The practical bottom line
A flush-trim router bit should cut with a steady, controlled resistance, not pull the work or router along the edge. Sudden grabbing usually points to self-feeding, excessive cutter engagement, unstable support, interrupted bearing contact, or a difficult grain transition made worse by one of those factors.
Treat a kickback as a setup failure to diagnose, not a normal part of routing. Reduce the waste before trimming, keep the bearing positively guided, support the work, and use the feed direction that resists cutter rotation. For any machine-specific setup, installation question, or safety device, consult the current router and bit manufacturer documentation before proceeding.
References
- Flush trim router table kick back questions. (n.d.). https://www.reddit.com/r/BeginnerWoodWorking/comments/s0q64c/flush_trim_router_table_kick_back_questions
- Understanding Router Table Kickback | RouterPlan Learn. (n.d.). https://routerplan.com/learn/safety/router-table-kickback
- Router Kickback: Why It Happens and How to Prevent It. (n.d.). https://www.woodwiki.org/guides/router-kickback
- Why do I get kickback when flush trimming with a router …. (n.d.). https://www.facebook.com/groups/woodworkingforbeginner/posts/2527835920704351
- Avoid Router Blunders. (n.d.). https://www.woodmagazine.com/avoid-router-blunders-8783406
- Flush trim tearout - Tips wanted : r/woodworking - Reddit. (n.d.). https://www.reddit.com/r/woodworking/comments/1b06e6h/flush_trim_tearout_tips_wanted
- Router Kickback in Ultra Slow 19,000 FPS and How to Avoid It. (n.d.). https://www.youtube.com/watch?v=titM-kmfu-g&xstg=CAMSBhUDzO3xHw%3D%3D
- Flush Trim Bit Kickback on End Grain — How to Avoid It | TikTok. (n.d.). https://www.tiktok.com/@spiegelwoodshop/video/7637527902824729869
- Router Table Safety: 10 Tips to Avoid Kickback and Protect …. (n.d.). https://kmtools.com/blogs/news/router-table-safety
- Router Template Tips & Avoiding Router Kickback. (n.d.). https://www.youtube.com/watch?v=RZzbY0fieYo&xstg=CAMSBhUDzO3xHw%3D%3D
 Why Router Bits Break: Feed Rate, Cut Depth, and Safer Pass Planning
 How to Clean and Maintain a Drill Chuck That Sticks
 Why a Circular Saw Blade Deflects During a Cut and How to Troubleshoot It